How To Draw Like The Old Masters - The Definitive Guide To Master Studies (2025)

Master studies are the self-taught drawing student’s best friend.
This article is a little different to the definitive Guides you read so far on this site.
Instead of treating a specific technique, I want to show you one way of practicing at home that is very effective: Master studies.
In this article I show you three master studies I did, with notes on what each one taught me:
John Singer Sargent, Edgar Degas, and Frank Dicksee.
You’ll also learn why you should do master studies, where to find references, and how to do master studies on your own, step by step.
What Is A Master Study?
A master study is simply a drawing or painting you make of an old master drawing or painting.
Essentially you chose a master, and then draw their artwork. Of course the goal is to learn, not to copy and claim this is your work.
There is a lot of liberty in how to do a master study.
Some examples:
Only study specific anatomy parts of the painting (e.g. eyes, or the torso, etc), to learn how the master handled the design of that part.
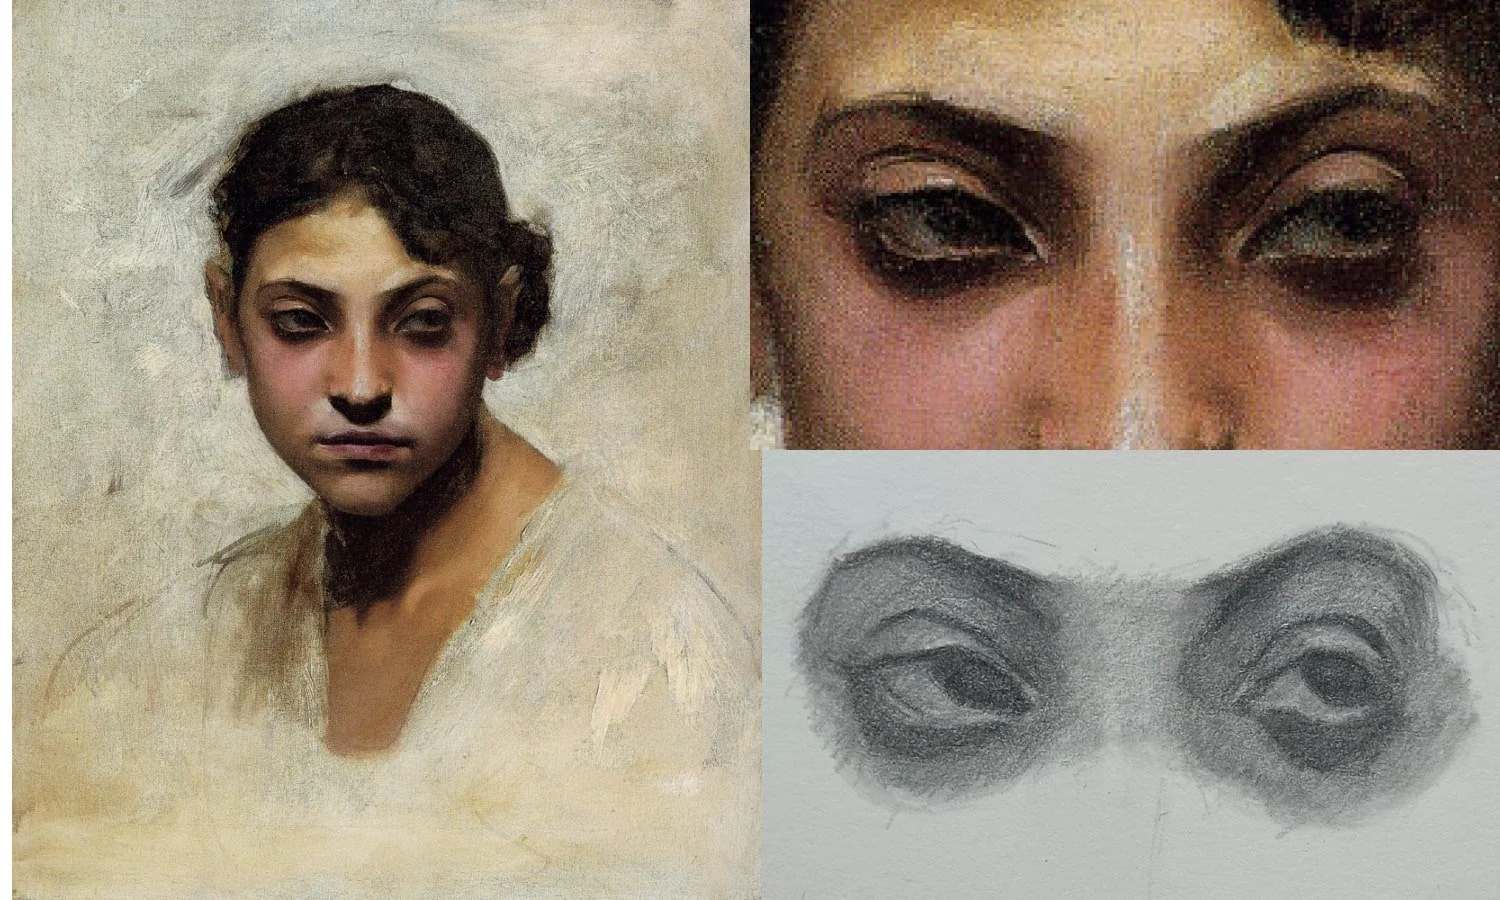
Master studies are an excellent way to learn anatomy. You hit two birds with one stone: Improve your anatomy, and your design sense, at the same time (Sargent master study).
Study only the composition of the painting by doing a simple composition study
Copy the whole piece as close to the original as possible (time consuming)
Do brief sketches of just a part of the master painting. This are great if you have only limited time to practice.

A quick Robert McGinnis master study. Just take 20-30 minutes and try to capture the part you want to absorb.
For your first master study, I recommend starting with sketches of the parts that catch your eye, and experiment from there. There’s lots you can learn from old master painting, so have clarity in your mind what you want to “absorb” and focus on that.
Why Should You Do Master Studies?
They built an intuitive sense for design, on a visceral, feeling level. You can “feel” the design as you study it, and this intuition helps you when doing your own drawings.
They train your eye to see nuance ( in line, shape, value design) that you previously wouldn’t have perceived. This translates to your own drawings.
They teach you simplicity, and how to get a strong effect with very little.
They expand your mind.
They reconnect you to beauty.
They help you find what you want your art to look like, by absorbing a little bit from each master in each study.
They help you stay motivated, especially as a self-taught artist.
How To Do A Master Study - Examples
Now that you’re clear what master studies are and why they are a valuable learning tool, let’s dive into how to do a master study.
For that I show you three master studies of my own, what my approach was and what I learned.
Lessons Learned From Sargent
Master study of John Singer Sargent.
Approach:
Before actually drawing anything I started by writing down association. You can see some of my notes on the picture above. I felt a strong energy gesture going through the body, that rests on the horizontal structure of the shoulder girdle. I also got a sense of “porcellan” the way the skin is modelled. Like fine chinaware. There’s this contrast of softness inside the torso, and hard angular lines in the arms.
From there I did a purely chaotic gesture study first, to connect to my purely emotional response to the drawing, without worrying about accuracy.
For the final master study I decided to use different materials than in the original: Ballpoint pen and an oil-based pencil. These are meant to be fun, and translating a master piece into a different medium than it was originally created in can be an interesting challenge.
What I learned:
Sargent's drawing is both elegant and simple, but as your get into it every line has so much sensitivity in it, so much nuance. You can only pick it up when copying him.
While the drawing looks very linear, he has very tight value control and you can observe the value hierarchy he follows (lightest on chest, darker on legs, etc). He also combines super soft tones to model form with angular lines in the contour and arms.
He models forms very literally. The head is a cylinder, the torso a mix of a box, and an egg. The legs and arms a mix of a box and cylinder.
My main takeaway: Sargent is great to study if you struggle with form!
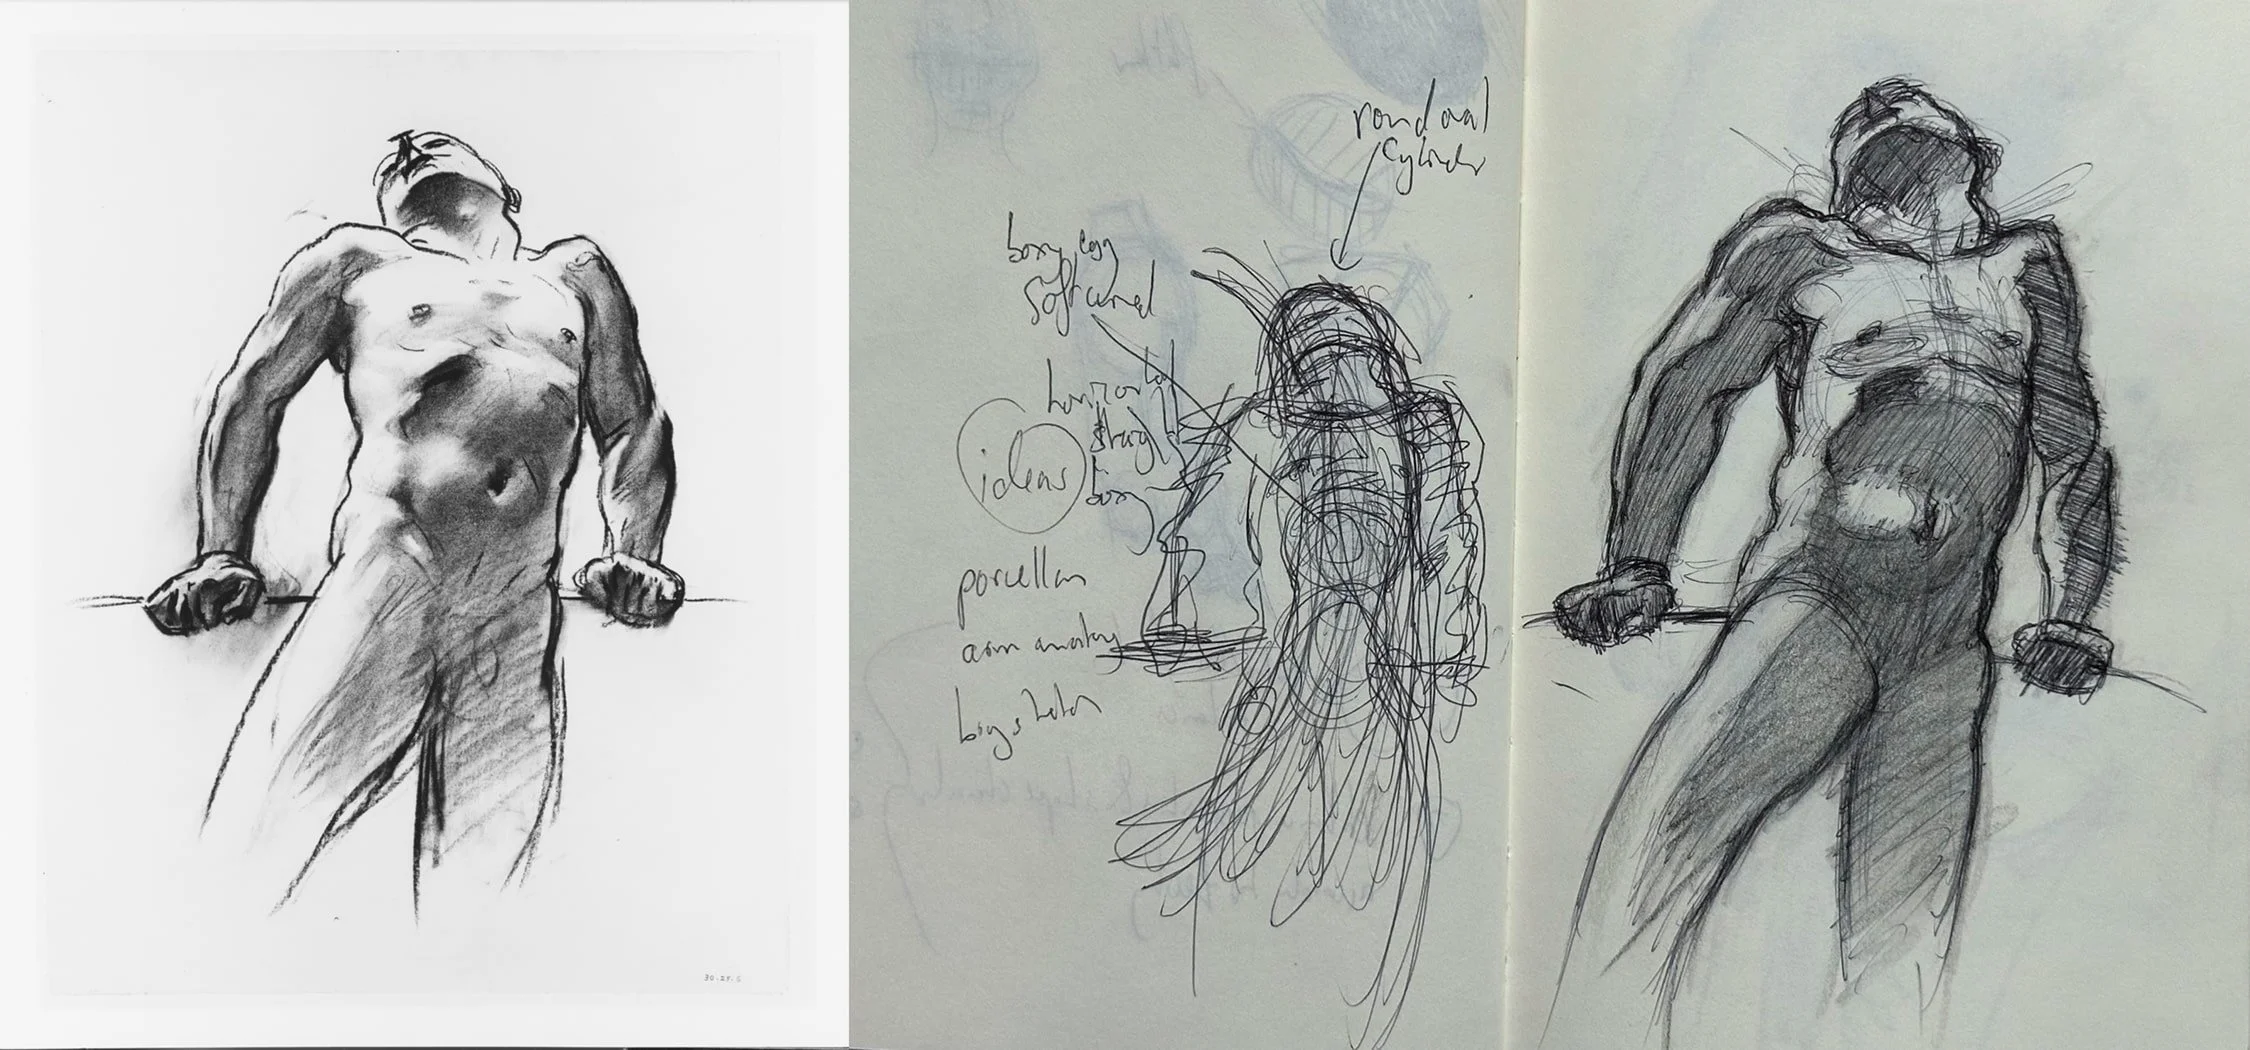
Lessons Learned From Degas

Master study of Edgar Degas.
Approach:
I took an 8B pencil and simply started drawing. The great thing about an 8B pencil is that it’s very soft, and can easily be blended. I laid in the drawing without using strong pressure. This means you can create a version 1, then go over the whole drawing again to create a version 2, and so and so forth. Each time you go through it, you correct and refine the contour, the shapes, the lines.
Once I was happy with the overall lay-in, I started to build up the value. I used my finger to model the lights using cross contour type strokes, that blended the graphite into the light side.
I build up the darks by applying more and more pressure with the 8B pencil, and used an HB pencil to add a bit more light tone in the lights.
Overall, I just went into it. This is a great approach if you have little time, and want to explore the master piece in a free, sketchy way. You just get into it and explore it’s rhythms.
What I learned:
Degas uses very dark, thick contour lines. The whole silhouette of the figure is defined by dark lines. It creates clarity in the design.
There’ a strong rhythm and flow in his painting. The whole piece feels like a materialised rhythm as you draw it. The rhythms extend beyond the figure in abstract lines that indicate a chair.
He uses a very simple value hierarchy: light on the arm, dress and face, dark elsewhere. Mid tone in the background and the hair.
My main takeaway: I’ll definitely study more Degas paintings, I like his aesthetic!
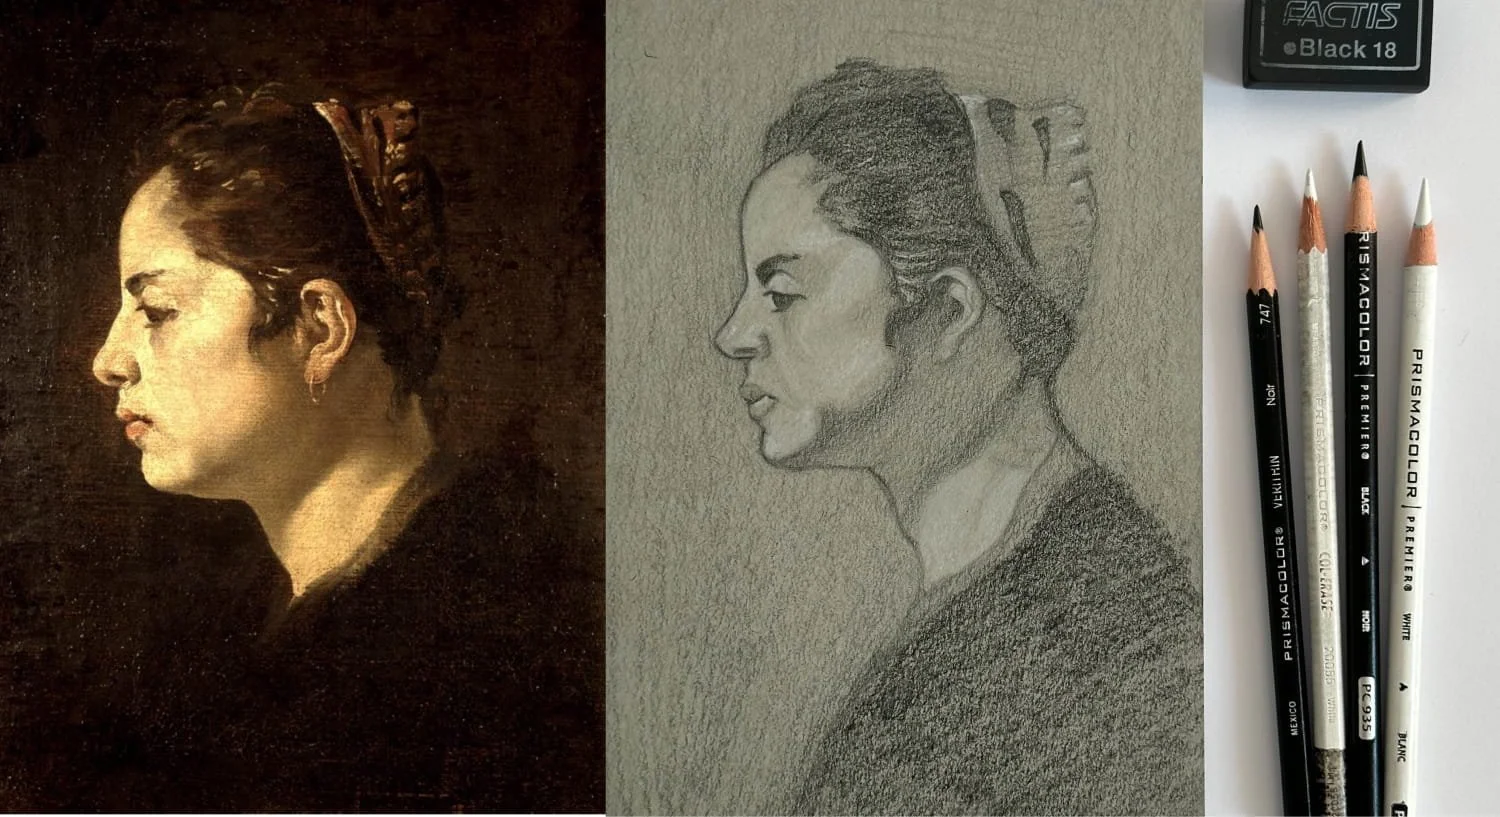
Lessons learned from Dicksee

Masterstudy of Frank Dicksee
Approach:
I found this painting in a book on Alma-Tadema, and only later realized it referred to a painting that Alma-Tadema collected in his house, by a guy called Frank Dicksee.
I used an HB pencil and my sketchbook, and tried to build up the figure. Nothing fancy.
What I learned:
I learned that Dickmann was a master at designing “flow” using asymmetry in the figure. You can notice that nothing in this piece is symmetrical. The knees, the ankles, the arms, the breasts, they all relate to their counterparts with diagonals, that move the viewers eyes through the piece.
A lot of the sense of depth comes from how he designs the bent leg.
The contour is very clear, and has no ambiguity, even though the line is very delicate (compared to Degas where the contour was very thick).
My main takeaway: I realized I have to work on my understanding of the upper back anatomy, and how it connects to the torso, and the arms.
How To Find Master References
Finding master references is easy in the era of the internet.
Almost all big famous museums publish their collections online in extremely high quality, and using those is an excellent way to get better.
Here are some online collections I love:
Now I do recommend you check what museums are in your local area, as there is just no comparison to studying masters in real life. Painting and drawing are art forms you have to see in real life to really appreciate them.
That being said, drawing from online collections is a portable, effective way to use master studies in your drawing practice.
Which Old Master Should Should You Study?
Which master to study is a personal question.
If no one comes to mind, start with this personal collection I created on the ArtRenewalCenter of my favorite master pieces.
From there simply expand your library. If you love a master, use chatGPT to find out who that master studied, and what movements influenced him or her. Through that you find new masters you can study.
Here’s a final tip that is critical when doing master studies:
ONLY study master paintings or drawings that truly stand out to you. Don’t pick any painting from that artist you love. Pick the one you think is the very best, and study that one.
You are following your own aesthetic sense by studying the painters that truly resonate with you. At the same time you absorb a bit of every master you study. So it’s a back and forth process that one the one hand clarifies your taste and vision, while at the same time refines and expands it.
Closing Thoughts
That’s it!
Make sure to try your own master study right now, or at the very least today. I promise, you’ll be surprised at the impact it has on your drawing!
If you enjoyed this article, and you’d like help integrating master studies into your practice, make sure to check out my Foundations of Realism Course below.
Until next time.
Felix